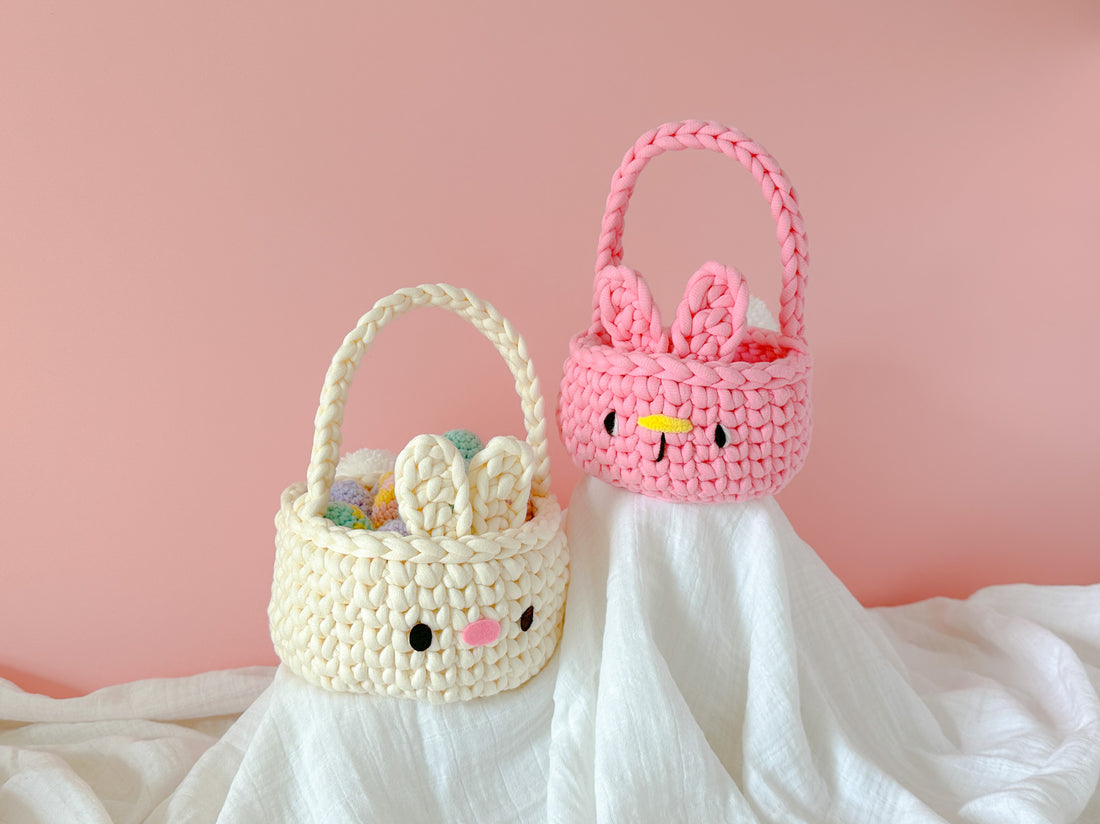
Hoppy Easter! This project is perfect for you if you're preparing an Easter basket for your little ones or even an egg hunt.
Project Time: ~1 hr
MATERIALS:
- 10 mm hook
- #7 jumbo yarn – Bungee Mini Yarn – 200 g (7.1 oz)
- Light Pink (14)
- Cream (04)
- Note: You will need 1 skein of the prescribed brand. Not all #7 weight yarn is the same! You can use Yarn Sub to compare for yourself. T-shirt yarn will also work but you can also double up on White acrylic yarn. I don’t recommend chenille as it has less structure/stitch definition.
- #4 medium worsted yarn
- White
- (Optional if embroidering the facial features) - Brown, yellow
- Felt
- Pink
- Brown
TERMS:
- blo: back loops only
- ch: chain
- dc: double crochet
- hdc: half double crochet
- hdc-inc: half double crochet increase
- ks: knit stitch
- sc: single crochet
- slst: slip stitch
- st(s): stitch(es)
- rnd(s) – round(s)
- [#] – stitch count
- (…) x # – repeat the instructions within the parentheses # of times
NOTES:
- Measurements: 7 in. x 8 in.
- We will be working in joined rounds. The “ch 1” does count as the first st in my designs.
- The basket and handle are made in one piece. The ears are separate and will be sewn or glued down.
- Please do not copy/redistribute any part of this pattern as your own. This includes reposting/translating without permission. Feel free to sell your finished products in small quantities – I only ask that you give credit to help support my work. Tag #curiouspapaya to share your work!
BASKET (in the color of your choice)
If you prefer an ad-free version of this pattern, you may purchase the premium pdf HERE. Please note that this pattern is able to remain free on my site due to the ad revenue it generates. Thank you for your support!
*Note: The ch 1 counts as the first st. “hdc-inc” means half double crochet increase!
Rnd 1: Make a magic circle and (hdc) x10, slst into the first st to join the rnd [10]
Rnd 2: ch 1, hdc into the same st, (hdc-inc) x9, slst into the first st [20]
Rnd 3: ch 1, hdc into the same st, hdc into the next st, (hdc-inc, hdc) x9, slst into the first st [30]
Rnd 4: ch 1, (blo) – sc all around, slst into the first st [30]

Photo shows how the previous rnd will create the flat base. We will now crochet the “wall” of the basket.
Rnd 5-11 (7 rnds total): ch 1, ks all around (tutorial HERE). slst into the first st. [30]
Do not fasten off. We will continue onto the handle.
HANDLE
Watch my support tutorial HERE.
Step 1: ch 25 (adjust as needed). Count 14 sts around the basket and slst into the 15th st.
Step 2: slst into the st to the left to reinforce the handle. Turn your basket so that you can slst down the handle.
Step 3: When you reach the beginning of the handle where we started, slst into the st next to it as we did earlier.

Do not fasten off. We will continue onto the border.
BORDER
Step 1: slst around one half of the basket. When you reach the handle, work in front of it and adjust your working yarn if needed.
Fasten off and leave a short tail for weaving in. Secure the very end of the yarn tail with a bit of hot glue so that it doesn’t unravel.

EARS
Make two
Step 1: ch 7. dc into the third ch from the hook, dc, hdc, hdc, sc.
Fasten off and leave a short tail (if you plan on sewing them onto the basket, leave a longer tail. I recommend hot gluing to secure the ears on because sewing with this thick of yarn can be tricky).
Step 2: Tie the yarn tails in a knot and secure them onto the bottom inch of the ear with hot glue.
Step 3: Glue the bottom inch of the ears and secure them onto the inside of the basket, 2 sts apart at a slight angle.

TAIL
Step 1: Use the pom pom maker in the size listed in the materials to create a tail. Watch a tutorial HERE.
Step 2: Trim stray ends to make your pom pom rounder.
Step 3: Apply hot glue to the center of the pom pom and secure it onto the backside of the basket near the brim.

FACIAL FEATURES
*Note: I recommend creating felt features for the face (see main image). However, I’ve provided alternative steps for those who prefer not to work with felt below. Please note that embroidering the features will cause the inside of the basket to show all the knots. If you prefer, you can add a lining.
Eyes/Mouth: Cut a long strand of brown yarn and embroider the eyes 2 rnds beneath the slst border we created, 6 sts apart. Embroider a mouth 2 rnds tall between the eyes. Then cut a strand of white yarn to create the outer “whites” of the eyes for a “playful” look.
Nose: Cut a strand of yellow yarn and embroider it 2 sts across, centered between the eyes.
To secure the ends, I tied each of the tails into a knot and then cut it short. Then, I put a dab of hot glue over it so they stay in place.

Easy peasy, lemon squeezy! If you enjoyed this free pattern, please let me know in the comments!
Find my free Easter egg pattern HERE. Have a wonderful Easter!
