Where my BTS fans at?!
I gotta admit, I was pretty late to the party. My students would SQUEEL over this K-pop boy band and come to class all decked out in BTS gear. I figured that my days of being a K-pop fan girl were over (Big Bang, Super Junior, anyone?) but was I WRONG.
What's funnier is that all my Korean mama friends are super into them too! BTS is also the first K-pop group that's had a significant presence in the American music industry. Listen to their newest song, BUTTER. I can't get it out of my head !
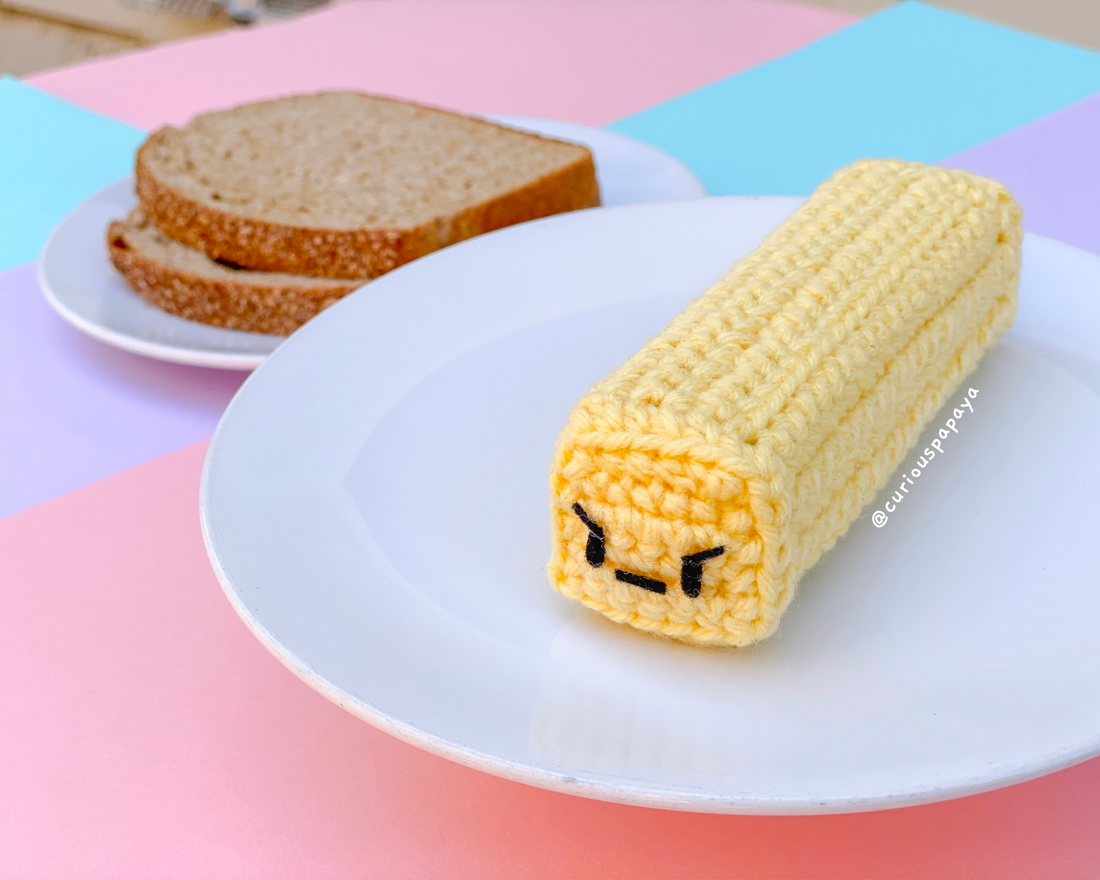
And what's even better is... this butter's got a butt. Arguably its best asset.

*If you prefer an ad-free, printable PDF version of this pattern, you can purchase it HERE. Thanks for supporting my designs!
*Note: Please do not copy/redistribute any part of this pattern as your own. Feel free to sell your finished products in small quantities - I only ask that you give credit to help support my work :). I would also love for you to share photos of your cute creations made with my pattern by tagging #curiouspapaya on Instagram. Thank you!
MATERIALS:
-Check out the list of my FAVORITE CROCHET TOOLS
-Any #4 medium worsted yarn
-3.5 mm hook
-Tapestry needle, scissors (I linked the specific pair above for extra crisp details!), stitch markers, fabric glue, hot glue
-Fiber fill stuffing
-5 x 5 in. scrap cardboard
-Black felt -or- black embroidery thread for the facial features and butt (yes, butt)
TERMS:
-BLO: back loops only
-CH: chain
-DEC: decrease
-FLO: front loops only
-INC: increase
-SC: single crochet
-SLST: slip stitch
-ST(s): stitch(es)
-RND(s): round(s)
-WS: wrong side
-(...) x #: repeat directions in the parentheses # of times
BUTTER part A (make two in yellow yarn):

ROW 1: Make a slipknot and CH 7. Starting in the second CH from the hook, SC down the row. [6]
ROW 2-5: CH 1, turn. SC down the row. [6] (4 rows total)
Now, let's SC around the edges. We will be working in a counter-clockwise direction.
LEFT EDGE: From the corner ST where you left off, CH 1 and SC into the same corner ST. SC into the next 3 STs. When you get to the bottom lefthand corner, SC, CH 1, and SC again.
BOTTOM EDGE: SC down the row. When you reach the bottom right corner, SC, CH 1, SC again.
RIGHT EDGE: SC into the next 3 STs. When you get to the upper right corner, SC, CH 1, and SLST in the same ST. Leave a short tail to tuck in.
*Repeat these steps to create the second piece of part A.
BUTTER part B:
NOTE: (we will make the four long sides in one continuous piece)

ROW 1: Make a slipknot and CH 21. Starting in the second CH from the hook, SC down the row. [20]
ROW 2-6: CH 1, turn. SC down the row. (5 rows total) [20]
This is one side of the butter stick. Repeat rows 2-6 3 more times, going through the back loops only for the start of each new section.

ASSEMBLY:
*Note: It’s important for your butter stick to have structure! I experimented by only adding soft fiber fill but it wasn’t quite recognizable as butter. I wouldn't recommend skipping this next step.
STEP 1: Make sure that your "part B" is facing downwards with the edges made from the FLO STs invisible for this step. Cut out 4 long rectangles of cardboard and use hot glue to secure them onto each rectangular section.
*Note: Be sure to leave a small margin on each edge so that they can fold easily!

STEP 2: Fold each side so it looks like a rectangular cylinder with the lines created from the FLO STs in part B facing the outside. We need to create the 4th edge now!
Use your tapestry needle and tail to sew through the BLO of the edge the yarn tail is coming out of and the starting CH STs of the part B. This will create the fourth edge of our butter stick.


*Note: Allow yourself time with creating these details! We often think this will be the fastest part when in reality it takes me about 20-30 minutes if I'm wanting to be extra careful.
STEP 3: Cut out an angry face out of black felt and secure them onto one square from "part A" (or substitute this with safety eyes and an embroidered mouth). Sew it on through the BLO.
STEP 4: Add stuffing. This is a great opportunity to use your yarn scraps as stuffing since the cardboard will be blocking them from showing through!
STEP 5: Cut out two curves out of black felt for the butt and secure them onto the other part A - or - use embroidery thread. Weave your tail through the other side of the butter.


And you're done! For extra fun, you can use a butter serving dish as a prop for photos. Now your little stick o' butta can jam out with you! Tell me in the comments, what other K-pop bands do you love?

4 comments
Thank you for responding! It’s an amazing pattern I made it on TikTok for my kiddos!
Thank you Mimi for catching that and for bringing that to my attention! The instructions there must have gotten left out by mistake when I was migrating it from my old site. It’s fixed now!
Just here to say that I just finished the rows of part B and am on the “folding” part and didn’t see anything that stated FLO ST while making the 24 rows. Am I just extremely blind or is it not in the instructions??
My daughter needs a stick of butter for her play kitchen. So excited to have found this. Thank you!