
No tricks here - just treats. These crochet candy bars are the perfect handmade touch for your Halloween setup. Each one is stitched in festive fall colors and embroidered with fun phrases like MMM, YUM, and CANDY. Soft, sweet, and calorie-free - the only thing scary is how cute they are!
MATERIALS:
- 2.75 mm hook
- 1.75 mm hook
- Scissors
- Yarn Needle
- Stitch Markers
- Hot Glue
-
Foam insert
- Note: I sourced my foam from recycled packing materials. This firm but flexible material gives the crocheted candy bar more structure but if you aren’t able to obtain this, you may substitute with fiber fill instead!

-
#3 light worsted cotton yarn - Hobbii Friends Cotton 8/8
-
main color of your choice:
- Note: You will need less than 1 skein of each color.
- Tomato (40) - red
-
Americano (20) - dark brown
- Sapphire (85) - blue
-
main color of your choice:
-
Embroidery thread
- white
- red
- yellow
-
Felt
- red
- yellow
-
brown
- Note: I recommend the one linked because it is a paper-like felt for cutting out fine details for small surface areas. Do not use craft felt as it is too fuzzy!
NOTES:
- Please do not copy/redistribute any part of this pattern as your own. This includes reposting/translating without permission. Feel free to sell your finished products in small quantities as long as you give credit to help support my work. Tag your creations with @curiouspapaya so I can feature you!
- This pattern is written in US terminology.
- This pattern will be worked in continuous rounds (a spiral) and rows.
- In this pattern, I am using the “yarn under” method of crocheting. This creates a beautiful “x-shaped” stitch definition. Please note that if you choose to “yarn over” instead, you may need to adjust your tension on the “label” part of the pattern so that it spans the candy bar wrapper properly.
- Difficulty: beginner to intermediate+
- Measurements: 2.5 in. x 1 in. (if using the prescribed materials)
ABBREVIATIONS:
- ch: chain
- sc: single crochet
- slst: slip stitch
- st(s): stitch(es)
- rnd(s): round(s)
- [#]: stitch count
- (…) x #: repeat instructions the number of times
CANDY BAR
In the color of your choice yarn + 2.75 mm hook:
If you prefer the printable pdf, you can find it HERE. Thank you for supporting my designs!
Make a slipknot and ch 17, slst into the first ch to make a loop and make sure it isn’t twisted.
- Rounds 1-13 (13 rnds total): sc all around [17]
EDGES
- Step 1: Flatten the two edges together. Work through both layers and use the working yarn currently on your hook.

- Step 2: *(both loops) sc , ch 2, work into the second ch from the hook, (both loops) slst into the next st*
- Step 3: Repeat ** in step 2 for a total of 4 times to make the jagged edge.
- Step 4: Fasten off and weave in the yarn tail.
-
Step 5: Measure the dimensions of the crocheted candy bar and trace it onto the styrofoam. Cut it out.
- Note: If using fiberfill stuffing instead, skip this step.
- Step 6: Insert the filling inside of the crocheted piece.
- Step 7: Flatten the two edges on the opposite side and join new yarn on the right edge (or if you are left-handed, the opposite side).
- Step 8: Repeat steps 2-4 to make the other jagged edge.
- Step 9: Determine the front side and the back side. To do this, position the “back side” of the jagged edges towards you (this helps create a crisper edge). Mark the front side of the candy bar with a stitch marker. We will need this as a reference point during assembly.
- Step 10: Weave in remaining yarn tails.
LABEL
Using white embroidery thread and a 1.75 mm Clover Amour hook:
Row 1: make a slipknot and ch 13, working into the second ch from the hook, make 12 sc down the row [12]
Rows 2-7 (6 rows total): ch 1, turn (counts as the first st), sc down the row [12]
Fasten off and leave a short tail.

Join the border color embroidery thread into the upper righthand corner and follow the diagram or written steps below.

- Top: 2 sc into the same st (corner), 10 sc, 2 sc into the same st (corner)
- Left side: 4 sc
- Bottom: 2 sc into the same st (corner), 10 sc, 2 sc into the same st (corner)
- Right side: 4 sc
If you are sewing, leave a long tail before fastening off. If you are gluing, cut a short tail and use the invisible finish.

The letters are made out of felt. Download and print the TEMPLATE for tracing and cutting. You may need to adjust the size!
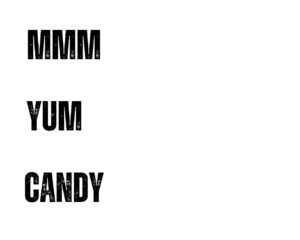
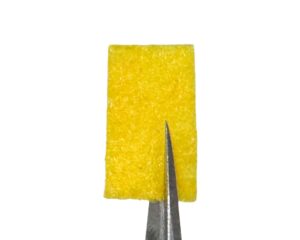
*Note: I strongly recommend using a stiffened, paper-like felt and a sharp pair of Clover Mini Patchwork Scissors for this detail. Using regular craft felt will result in messy edges.
ASSEMBLY
-
Step 1: Carefully glue the felt letters onto the label.
- Tip: Use fine-point tweezers to easily maneuver these tiny details!
- Step 2: Note the side of the candy bar marked with a stitch marker. We will be working on the opposite side. This is because the backside of the jagged edges is cleaner.
- Step 3: Glue the label onto the center of the candy bar.
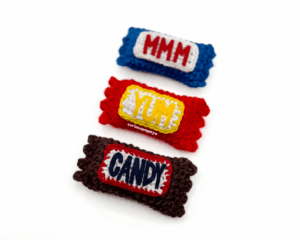
You’re finished! If you enjoyed this free pattern, subscribe to my mailing list to never miss a new release. I would love to hear from you in the comments! Happy crocheting! -Amy