Ahh... Spring is in the air and all the cute little chicks and bunnies are making their way here for Easter! But this isn't your average chick. She's spunky, grumpy, and she may kimchi-slap you if you push her buttons (did anyone get that reference? If not, Google it. You might either thank me or just be completely confused).
Meet Gertrude the Grumpy Chick! She's inspired by Korean ajummas (meaning older aunties or middle-aged women) and she loves gardening. Gertrude is the third - and final - pattern of the #bloomingbudsCAL hosted by autumnleaflet, olliehollycrochet, and moi! Check out the hashtag to view others' creations and for more info on Instagram.
*If you prefer an ad-free, printable PDF version of this pattern, you can purchase it HERE. Thanks for supporting my designs!

MATERIALS:
-Yellow, orange, cream, tan, and a color of your choice for the watering can. (Here, I'm using Impeccable Solids by Loops & Threads in Butterscotch, Aran, Soft Taupe, Pumpkin, and Mint. All yarn was found at Michael's Arts and Crafts Store.
-2.75 mm and 4 mm hook (will only be used for the hat)
-Yarn needle, scissors, stitch markers, fabric glue
-Black embroidery thread for the eyebrows
-Size 7 mm safety eyes
-Fiber fill stuffing
-1 square inch of cardboard, 1 pipe cleaner (for the watering can)
TERMS:
-BLO (back loops only)
-CH (chain)
-DEC (decrease)
-DC (double crochet)
-FLO (front loops only)
-INC (increase)
-SC (single crochet)
-SLST (slip stitch)
NOTES
-Read the pattern fully before beginning to familiarize yourself with it.
-Use a stitch marker and count your stitches after each round.
-Use pins when sewing parts together and check for uniformity.
-Fluff up your stuffing by pulling it apart and inserting it little by little to make your amigurumi more even. Stuff it some more right before closing using the tips of your scissors for a firmer shape.
- Measurements: 3.5 in. x 3 in. [~9 cm x ~8 cm] if using the prescribed materials.
HEAD (in yellow yarn):
RND 1: Make a magic circle and (SC) x 6 [6]
RND 2: (INC) x 6 [12]
RND 3: (SC, INC) x 6 [18]
RND 4: (2 SC, INC) x 6 [24]
RND 5: (3 SC, INC) x 6 [30]
RND 6: (4 SC, INC) x 6 [36]
RND 7-10: SC all around (4 RNDs total) [36]
RND 11: (INC) x 4, 10 SC, (INC) x 4, 18 SC [44]
RND 12: SC all around [44]
RND 13: (20 SC, DEC) x 2 [42]
RND 14: (5 SC, DEC) x 6 [36]
RND 15: (4 SC, DEC) x 6 [30]
RND 16: (3 SC, DEC) x 6 [24]
RND 17: (2 SC, DEC) x 6 [18]
Attach the safety eyes between RNDs 10 & 11, 7 ST apart with 5 spaces in between.
Do not fasten off. At this point, stuff the head and fill out the two cheeks well. [img 1]. Continue onto the body and stuff as you go.

BODY:
RND 1: FLO - (INC) x 18 [36]
RND 2: SC all around [36]
RND 3: (5 SC, INC) x 6 [42]
RND 4-5: SC all around (2 RNDs total) [42]
RND 6: (5 SC, DEC) x 6 [36]
RND 7: (4 SC, DEC) x 6 [30]
RND 8: (3 SC, DEC) x 6 [24]
RND 9: (2 SC, DEC) x 6 [18]
Leave a 10 inch tail and fasten off. Stuff the body some more. Sew the hole by using your yarn needle and going through the front loops only and cinching it closed.
WINGS (make two):
RND 1: CH 5. Starting in the second CH from the hook, (SC) x 4. [img 2]. Work along the bottom of the chain. (SC) x 4 [8]
RND 2-3: SC all around (2 RNDs total) [8]
RND 4: (2 SC, DEC) x 2 [6]
RND 5: SC all around [6] [img 3]
Fasten off. Leave an 8 inch tail for sewing. Do not stuff.

FEET (make two, in orange yarn):
RND 1: CH 2. SLST into the second CH from the hook. This will be the back part of the chick’s foot. Add a stitch marker here. *CH 2, SC into the second CH from the hook, SLST into the ST with the stitch marker.* This is the first toe.
Repeat between the ** two more times to make a total of three toes. Fasten off. Leave an 8 inch tail for sewing. [img 4]

BEAK (in orange yarn):
RND 1: CH 5. Starting in the second CH from the hook, SC into the next four ST. Now that you are at the end of the row, work along the bottom of the CH. SC into the next four ST. [8]
RND 2: SC all the way around. [8] [img 5]
Leave an 8 inch tail and fasten off.

WATERING CAN (in any color you choose):
RND 1: Make a magic circle and (SC) x 6 [6]
RND 2: (INC) x 6 (SLST the last ST which is in the sixth INC. [12]
RND 3: (BLO) - SC all around. [12]
Trace the base onto scrap cardboard and cut out a circle. Glue it onto the inside of the watering can [img 6]. This will give it more structure.

RND 4-6: SC all around (At the end of RND 6, SLST the last ST) [12]
RND 7: BLO - (DEC) x 6 [6]
Stuff, fasten off, and sew the hole closed. Bury the tail.
STEP 1: Cut off 2 in. of pipe cleaner and leave 3 mm on each tip. Take your yarn and wrap it around the whole pipe cleaner twice around. Make sure no fuzzies are showing. Use fabric glue to secure the end and trim off any excess yarn. [img 7]

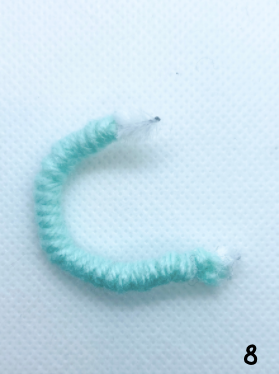
STEP 2: Bend the handle into a C shape and then coat the two ends of the pipe cleaner with fabric glue and secure them into the watering can at the top and the bottom. [img 8]
SPOUT (in color of your choice):
STEP 1: Cut off 1 in. of pipe cleaner and leave 3 mm on each tip. [img 9]

STEP 2: With your yarn and hook, make a magic circle and (SC) x 6. SLST into the first ST and fasten off, leaving a 6 inch tail for sewing.

STEP 3: Secure the circle we just made onto the tip of the pipe cleaner with fabric glue. Wrap the yarn tails around the pipe cleaner twice around just as we did for the handle. Again, make sure no fuzzies are showing. [img 10]

HAT (in tan and white yarn, 4 mm hook):
*Note: The hat requires you work with double stranded yarn. If you only use one strand, the hat will come out significantly smaller!
RND 1: Make a magic circle and (SC) x 6 [6] [img 12]
RND 2: (INC) x 6 [12]
RND 3: (SC, INC) x 6 [18]
RND 4: (2 SC, INC) x 6 [24]
RND 5: (3 SC, INC) x 6 [30]
RND 6-8: SC all around (3 RNDs total) [30]
RND 9: FLO - SC into the first ST of the RND, CH 2. This will count as your first DC.
Make a DC into the same ST. (DC) x 2 into the rest of the 29 ST in the RND.
Once you reach the end of the RND, SLST into first ST. [60] [img 13]
Leave a short tail to weave in and fasten off.


HAT STRAPS (make two, in tan yarn):
STEP 1: Cut two 15 inch strands of tan yarn and fold them in half. Use your crochet hook to weave them through the opposite ends of the hat. This photo tutorial demonstrates one side only.

STEP 2: Pull the tails through the loop.

STEP 3: Pull the tails tightly. Leave the excess length for the instructions under "Assembly".

ASSEMBLY:
BEAK: Sew the beak between rows 10-11. Because it is a bowl-shape, pinch it with your fingers.
EYEBROWS: Cut off 12 inches of black embroidery thread and weave it through above the two eyes. Bury the tail and fasten off. [img 17]

WINGS: Use your beak as your reference point to the middle of the body. Flatten the wings and sew them closed. Then, sew them on where the head meets the body. (I sewed one wing down and let the other free so it could hold the watering can).
FEET: Sew the feet on between RNDs 5-7 of the body, 5 ST apart.
HAT: Put the hat onto the chick's head. Take the two straps and tie a double bow around the chin. cut off the excess tail. Coat the ends with fabric glue to prevent fraying or leave them as is. [img 18]

Your chick is completed! Thanks for making Gertrude the Grumpy Chick.
12 comments
Absolutely adorable.
Thank youuuu, but can you tell me how tall is it?
i also would like the pattern for the cacti, there SO cute
hi love this cute little chick, could you tell me approximately how much yarn I would need for the this pattern.
Muito agradecida por você colocar a receita. Eu fiz e ficou muito fofinho.