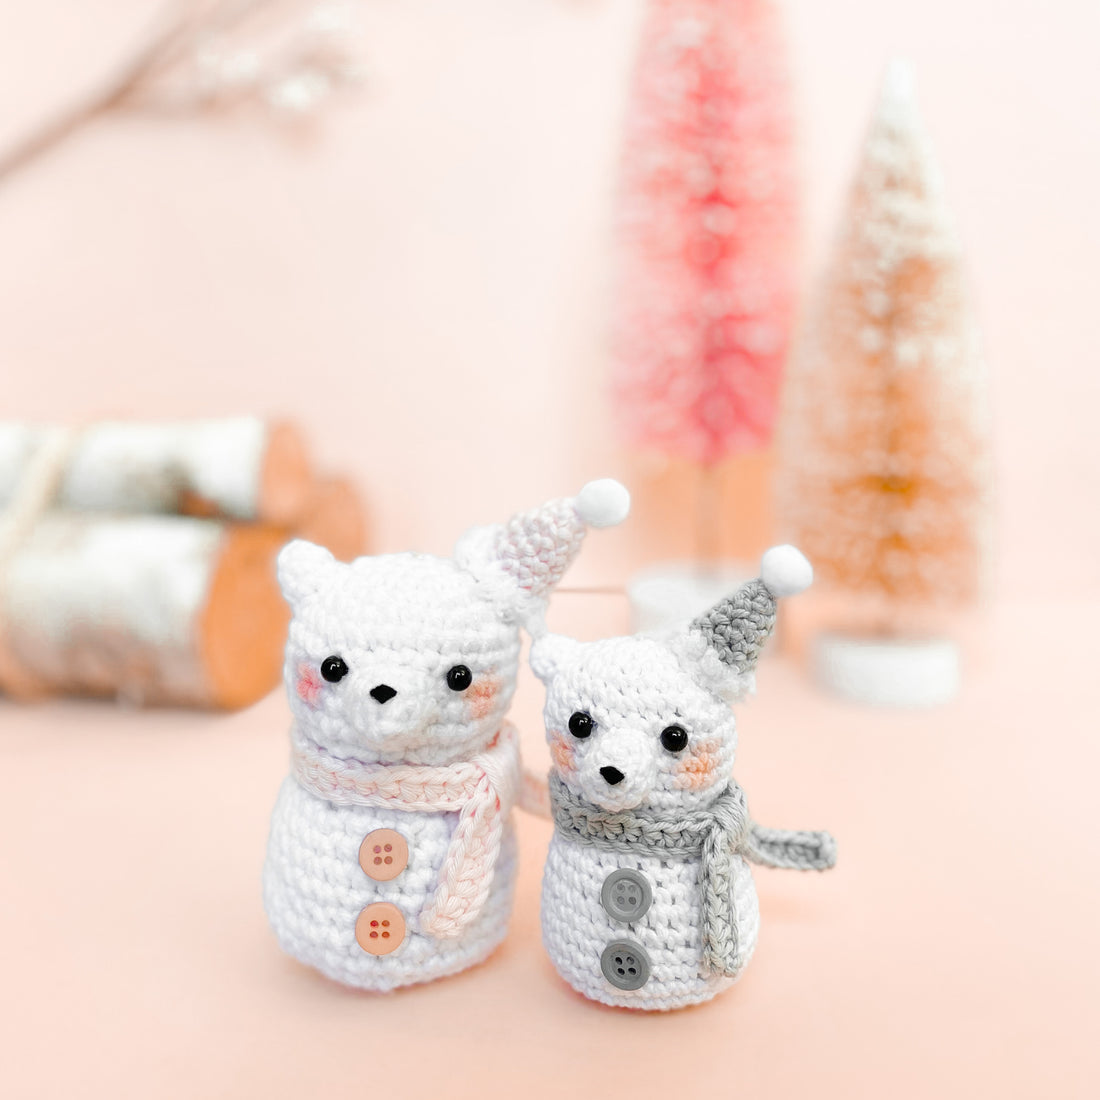
Meet Snowbear, a quick and festive holiday make. This was one of my earliest designs and I'm pleased to now share her as a free blog pattern!
The little cub in the photo was made with the exact same pattern - the only thing that I changed was the yarn weight (see below under materials).
*Please note that the pattern writing style differs slightly from my current writing style but it will not affect the quality of the pattern.
NOTES
*Please do not copy/redistribute any part of this pattern as your own. This includes reposting/translating without permission. The right-click disabling is to prevent theft - thank you for understanding and for supporting my hard work.
Feel free to sell your finished products in small quantities as long as you give credit to help support my work. Tag your creations with #curiouspapaya so I can feature your makes!
*We will be working in a spiral for everything but the scarves.
*Measurements: 4 in. x 2 in. for the larger bear if using the prescribed materials.
*Please email me at curiouspapaya@gmail.com with any questions you might have about this pattern.
MATERIALS
-#3 light worsted yarn - Paintbox Cotton Aran (for the larger bear) and Paintbox Cotton DK (for the cub)
- 1 skein of Paper White
- 1 skein of Ballet Pink
- 1 skein of Stormy Gray
-#5 bulky fluffy yarn - Bernat Pipsqueak
- 1 skein of White
-2.75 mm hook
-yarn needle
-6 mm size safety eyes for each bear
-black embroidery thread OR black felt for nose
-pink blush for cheeks, q-tip or brush
-Poly-fil stuffing
-hot glue
-white pompom for the hat
-buttons (you can usually find spare buttons attached to men's button-up shirts)
-optional: ornament string, fabric glue (to attach the string)
TERMS
-SC (single crochet)
-HDC (half double crochet)
-FLO (front loops only)
-INC (increase)
-DEC (decrease)
-CH (chain)
HEAD (in white yarn)
Find the ad-free premium PDF HERE. Thank you for supporting my designs!
rnd 1: Make 6 SC into a magic circle [6]
rnd 2: (INC) x 6 [12]
rnd 3: (SC, INC) x 6 [18]
rnd 4: (2 SC, INC) x 6 [24]
rnd 5: (3 SC, INC) x 6 [30]
rnds 6-10: SC all around (5 rnds total) [30]
rnd 11: (3 SC, DEC) x 6 [24]
rnd 12: (2 SC, DEC) x 6 [18]
Do not fasten off. We will work the head and the body in one piece.
Between rows 7 & 8, insert the safety eyes 7 stitches apart.
BODY
rnd 1: FLO - (2 SC, INC) x 6 [24]
rnds 2-3: SC all around (2 rounds total) [24]
rnd 4: (3 SC, INC) x 6 [30]
rnds 5-8: SC all around (4 rnds total) [30]
rnd 9: (4 SC, INC) x 6 [36]
rnd 10: SC all around [36]
rnd 11: (4 SC, DEC) x6 [30]
rnd 12: (3 SC, DEC) x 6 [24]
Stuff well.
rnd 13: (DEC) x 12 [12]
Stuff some more until you get a firm shape before sewing hole closed.
EAR (make one in white yarn since the other will be covered by a hat)
rnd 1: 4 SC into a Magic Circle [4]
rnd 2: (SC, INC) x 2 [6]
rnd 3: SC all around [6]
Fasten off, leave a tail for sewing. Lightly stuff.
MUZZLE (in white yarn)
rnd 1: 6 SC into a Magic Circle [6]
rnd 2: (SC, INC) x 3 [9]
rnds 3-4: SC all around (2 rnds total) [9]
Fasten off, leave a tail for sewing. Lightly stuff.
HAT (your choice of color)
rnd 1: Make a magic circle, 3 SC [3]
rnd 2: (INC) x 3 [6]
rnd 3: (SC, INC) x 3 [9]
rnds 4-6: SC all around (3 rnds total) [9]
Change to white fluffy yarn.
rnd 7: SC all around [9]
SCARF (your choice of color)
CH 45. Starting in the second chain from the hook, HDC down the row. Modify as needed. [44]
ASSEMBLY
-Ear: Between rnds 3 & 6, sew the ear on the left side of the head.
-Hat: Sew or glue the hat on the right side of the bear’s head.
-Muzzle: Between rnds 7 & 8, sew the top of the muzzle in between the eyes. The bottom of the muzzle should fall between rows 9 & 10.
-Nose: Make a nose out of felt or embroidery thread and attach it to the top of the muzzle
-Blush: Use pink blush and lightly build the color on the cheeks. You can always layer to create a more pigmented look!
-Buttons: Sew or glue on the buttons on the body
-Scarf: Wrap the scarf around the neck. For a neater look, I created an X with the scarf and wrapped yarn in the middle, securing it with glue. You can also dap a touch of glue on the ends of the scarf so it lays flat against the body.
You're finished! I hope you enjoyed whipping up this quick and festive make. I turned mine into an ornament simply by securing some string onto the top of the bear.
1 comment
Adorable! Thank you for the pattern!